Faceting limits
By Bruce L. Harding
Holden, Massachusetts, USA
Copyright GIA
Table of content
Introduction
The pavilion and bezel slopes commonly recommended for faceting are the result of trial-and-error and human judgment. This explains why references differ in their recommendations.
Trial-and-error is an effective way to solve complex problems until a better way comes along, but it usually finds only the best solution in the range of experimentation. Other good solutions may exist – beyond the bad ones – but are found only by accident. This has been as true in faceting as in many other scientific fields.
Inspired by an exceptionally brilliant but strangely-cut emerald, the writer went in search of these other solutions and found that there are indeed two ore three areas of good design for each gem material.
This article presents the first and most important result of that search – charts for each of the common faceting materials which show areas of good and bad pavilion and bezel slope combinations; it also defines maximum and minimum table sizes briefly (more later). The faceter can choose from the various «good» areas according to what he thinks is best or to suit the limited proportions of his rough material.
The text describes the formation of these charts so that you can understand them better. Technical details are omitted; it is assumed that you are either familiar with gemology optics or don`t care. The mathematics involved are quite simple but are deferred to an appendix for those who care to understand them or who may need to create additional charts.
Objectives
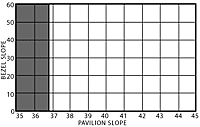
Figures 1 through 8 show a grid which represents all combinations of pavilion slopes from 35° to 45° and bezel slopes from 0° to 60°. Pavilion slopes greater then 45° are not considered in this initial discussion but will be described in future articles as they apply to certain facets.
It is easier to define that which is bad about a gem than that which is good, so the object of this study is to delete areas of the grid which represent poor designs. Dark shading will be used for the worst conditions, medium shading for those which are less severe, and light shading for minor faults. "Best" designs will then lie in the areas of lightest shading.
Figures 1
Dead Center
If the pavilion slope is less than the critical angle, no reflections can be seen through the table when looking into it perpendicularly; furthermore, reflections through the table cannot be seen from more then one side of the pavilion in other positions.
This "dead" center condition is very undesirable so pavilion slopes less than the critical angle are shaded dark on the grid, as shown for peridot in Figure 1.
The Viewer`s Head
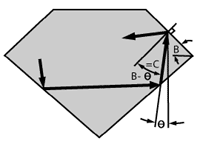
Rays which are reflected to the viewer`s eye must come from directions which missed his head. Figure 2 shows that at a viewing distance of one foot, as when examining a stone prior to purchase, the angle (or divergence) between incident and reflected directions of the same ray must be at least 10°; otherwise the viewer will see reflections of himself.
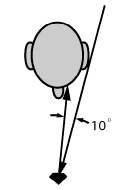
Figure 2
Table-to-Table Rays
Figure 3A shows a ray entering and leaving the table, being reflected off both sides of the pavilion. For each pavilion slope P the internal divergence D (=180°-4P) is constant regardless of the ray angles. The corresponding external divergence is larger and varies according to the refractive index of the material and the ray angles; it is minimum when it is symmetrical as shown in Figure 3A.
For this minimum external divergence to be 10°, the pavilion slope is about 1.5° more or less than 45°. Slopes between these values produce less divergence, so that they are shaded dark in Figure 3B.
|
Figures 3a |
Figures 3b |
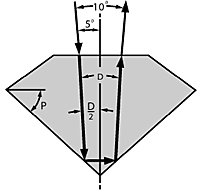
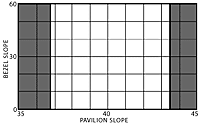
Table-to-Bezel Rays
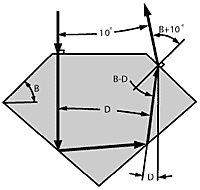
Figure 4A shows a ray entering the table perpendicularly, which returns to the bezel at an angle B-D to the bezel normal. By refraction, the corresponding external angle must be B±10° to provide the required minimum divergence of 10°.
Figure 4B shows plots of the two bezel slopes which satisfy this condition for each pavilion slope. Slope combinations between these plots produce divergence less than 10deg;. Because a large portion of returned light passes this way, this area is shaded dark.
|
Figures 4a |
Figures 4b |
Bezel-to-Table Rays
Rays which enter the bezel and leave via the table follow paths identical to those described above, except in the opposite direction; accordingly, the shaded area of Figure 4B applies to these rays also.
Bezel-to-Bezel Rays
Figure 5A shows a symmetrical ray entering one bezel and leaving via the other; its internal angles to the bezel normals are B-D/2. By refraction, the corresponding external angles must be B±5° to provide the required minimum divergence of 10°.
Figure 5B shows plots of the two bezel slopes which satisfy this condition for each pavilion slope. Slope combinations between these plots produce divergence less than 10°. Because the major portion of returned light passes this way, this area is also shaded dark.
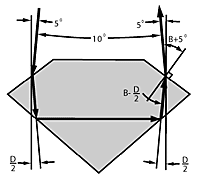
Figure 5a
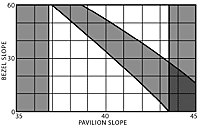
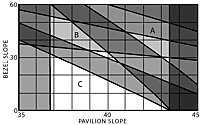
The Basic Faceting Chart
Figure 5B is the basic «faceting chart» which indicates the well-known critical angle limitation and the areas which violate the 10° minimum divergence imposed by the viewer`s head. These separate the chart into three unshaded areas which are labeled Zones A, B and C for simple reference.
Most recommended designs lie in Zone A; those for refractive indexes from 1.6 to 1.7, however, lie in Zone B. This explains the odd discontinuity in faceting data which must have puzzled inquisitive faceters. It is curious that experimenters found their way into Zone B for these stones only. There are no commonly recommended designs in Zone C; however, it applies to the exceptional emerald which inspired this study.
Note that the shading is intensified when one shaded area overlaps another; this indicates the worse situation of two bad conditions at the same design points.
Additional criteria will now be added to this basic faceting chart.
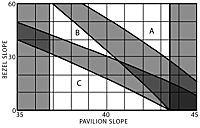
Figure 5b
Internal Reflections From the Bezel
Figure 6A shows an internal ray approaching the bezel at an angle to the gem axis. If its angle B- to the bezel normal is more than the critical angle C, it will be reflected back into the stone. The probability is that such rays will ultimately be lost through the pavilion (see future sequel), so such reflections are to be avoided as much as possible.
The maximum angle of a ray reflected from the pavilion is 180°-C-3P; if this ray is reflected as shown in Figure 6A, then all rays reflected from the pavilion are reflected back by the bezel. Designs which cause this intolerable condition are indicated by the dark area in the upper right of Figure 6B.
According to Figure 5A, a symmetrical bezel-to-bezel ray approaches the bezel at an angle B-D/2 to the bezel normal. If this angle is greater than the critical angle C, then all bezel-to-bezel rays are reflected because they cannot enter the first bezel at an angle which prevents such reflection from the second bezel. Designs which cause this bad condition are indicated by a medium-shaded diagonal area in Figure 6B.
|
Figures 6a |
Figures 6b |
Some rays will be reflected back by the bezel unless the minimum internal angle Q (= C-P) is not reflected. Designs corresponding to this limited back-reflection are indicated by the light-shaded diagonal area of Figure 6B; the area below this corresponds to designs with no internal reflections from the bezel, except for the following unusual situation.
With very low bezel and pavilion slopes, it is possible to have Qmax greater than B such that Q-B is greater than C. This causes reflections of some rays and is shown by a light shaded diagonal at the lower left for refractive indexes greater than 1.7.
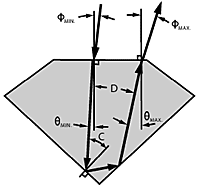
Range of Reflections Through Table
Figure 7A shows the extreme angles of a ray reflecting off both sides of the pavilion: min = C-P (negative) and max = 180°-C-3P (because D = 180°-4P). The corresponding external angles fmin and fmax are the limits at which the viewer can see reflections through the table from the far and near sides of the pavilion, respectively. Angle fmin is therefore the limit for seeing reflections from both sides at once.
These limits are noted across the top of the faceting chart in Figure 7B for each pavilion slope. Note that as one limit increases, the other decreases.
|
Figures 7a |
Figures 7b |
«Live» Center
For ultimate liveliness it should be possible to see reflections in the table from both sides of the pavilion with both eyes at once. At a viewing distance of one foot, as shown in Figure 8A, the angle between reflections to both eyes (two different rays) is about 12°. To see reflections from both sides with both eyes, therefore, the minimum external table reflection angle fmin must be at least 6°.
Designs which do not satisfy this condition are shaded light at the left of Figure 8B.

Figure 8a
Faceter`s Options
The faceter should choose a design from one of the lighter areas of the chart according to that he thinks is «best»
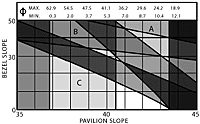
Figure 8b
- increase pavilion slope for wider range of «live» center,
- decrease pavilion slope for wider range of table reflections,
- increase bezel slope for greater dispersion,
- decrease bezel slope for greater brightness.
Maximum Table Width
Internal rays which hit the table at more than the critical angle to its normal will be reflected back into the gem and probably be lost through the pavilion. This can be avoided by limiting the table size so that any such rays hit the bezel instead of the table, Figure 9 shows the two extreme rays which cause this problem; oddly, they both define the same maximum table size.
Calculations show that this maximum table size is seldom less than 75% of girdle width for most stones faceted by amateurs (it is 53% for diamond with standard slopes).
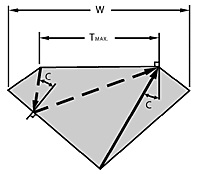
Figure 9
Minimum Table Width
The only justification for a minimum table size is to prevent seeing reflections of the culet in the bezel when looking perpendicular to the table. Figure 10 shows that this limit is defined by a ray from the culet to the edge of the table which is bent perpendicular to the table by the bezel.
Calculations show that this minimum table size is seldom more than 50% of girdle width.
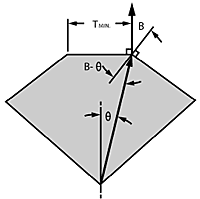
Figure 10
Optimum Table Width
Charts of maximum and minimum table widths, according to these criteria, will be presented vs. pavilion and bezel slope combinations for various refractive indexes in a future article. Another sequel will show that most of the light returned to the viewer passes through the bezel, so this in an argument against large tables.
Temporarily, therefore, table widths from 50% to 60% should be considered ideal until more data or criteria are available.
Charts for Specific Materials
|
|||||||||||||||||||||||||||||||||||||||||||||||||||||||||||||||||||||||||||||||||||||||
* Zone C includes the Table as a bezel with zero slope. Experimental cuts in this zone are brilliant but look strange and may not be desirable
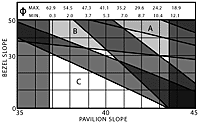
Faceting charts are shown for eight different refractive indexes representing common faceting materials: for other materials, use the chart with the closest refractive index, or make your own if the RI is over 1.9. Marks on these charts represent designs recommended by three common references: a solid dot indicates references referred to as 1 and 2; a circle indicates another reference 3.
The table on this page summarizes these data and indicates designs which appear to be best according to the charts. Designs which the chart indicates as not recommended are shown in parentheses.
Comments
The charts agree with references 1 and 2 in all examples but one and disagree with reference 3 in all but part of two. Reference 3 recommends the same angles for many stones; for RI`s greater than 1.6 these designs give almost zero divergences for table-to-bezel rays – perhaps this was the author`s intent, being unaware of the viewer`s head problem.
If it were important to find one design which was suitable to all stones, the closest solutions according to these charts would be: P/B=43°/35° (Zone A), =40°/32° (Zone B), =40°/17° (Zone C).
It is interesting to note that there are no good designs for the pavilion slope of 41°.
It is also interesting to note that pavilion slope is more critical than bezel slope; that is why I always cut the pavilion first (in addition to other reasons) if I run short of material
I can always «fudge» the crown a bit.
Zones A, B and C are of particular interest in re-cutting. A worn stone cut per Zone A can be recut per Zone B, and again per Zone C, always retaining the same girdle so that it can be replaced in the same setting; beauty will be retained and weight loss will be minimized. I have done this and its works!
Although it is possible to design a gem where the viewer`s head is not an obstruction, the viewer`s body is another problem and will always produce a dark area in the gem. A sequel will show that this dark area is most noticeable when the gem is cut in Zone C.
Conclusions
It is important to note that this analysis has three limitations:
- It assumes that pavilion and bezel slopes are constant: This is essentially true for brilliant cuts, but not for step cuts.
- It assumes that opposite facets have a common normal plane: This is true for round, square, and rectangular girdle shapes, but not for oval, pear, marquise, etc.
- It assumes that rays are in a plane through the gem axis: This is only a small part of all rays, but these are the only ones which can be analyzed simply.
The first two assumptions are also inherent in the design slopes recommended by various references; such data were developed by trial-and-error on round brilliant cuts but may be used as approximate guides for other cuts.
It is most significant, however, that the theoretical results show good correlation with those proven by trial-and-error, despite the third limitation described above. This indicates the validity of the method.
The key to this study was the effect of the viewer`s head, which can be observed by close study of reflections in a cut gem. Other criteria which may have been overlooked will be added in later articles. Several sequels are already in process which probe specific aspects of the problem in more detail.
As it stands, this is believed to be one of the better faceting guides to date. Comments from readers will be welcomed and reviewed toward making it even better.
Reference
- GIA Colored Stone Course (1975), Los Angeles, California.
- Soukup, E. J. (1962) Facet Cutters Handbook, Germac Corp, Mentone, California, 64 pages.
- Sinkankas, J. (1962) Gem Cutting – A Lapidary`s Manual, 2nd edition, Van Nostrand Reinhold Company, New York, 197 pages.
- Tolkowsky, Marcel (1919) Diamond Design, Spon & Chamberlian, New York, 104 pages.
Appendix
The following nomenclature and formulas were used in this analysis:
R = refractive index
C = critical angle (sinC =1/R)
D = internal divergence
D' = external divergence
P = pavilion slope
B = bezel slope
= internal ray angle
= external ray angle
T = table width
W = girdle width
Table-to-table rays blocked (Figure 3):
sin D/2 = RsinD/2 ... where: D = 4(45°-P), D' = ±10°
Table-to-bezel rays blocked, and vice versa (Figure 4):
sin (B-) = Rsin (B-D) ... where: = ±10°
Bezel-to-bezel rays blocked (Figure 5):
sin (B-) = Rsin (B-D/2) ... where: = ±5°
Internal reflection from bezel (Figure 6):
Bmax = +C (Figure 7A) Bmin = -C (not illustrated)
Maximum pavilion ray angle (max = 180°-C-3P):
Bmax = 180°-3P Bmin = 180°-2C-3P
Mean bezel-to-bezel ray ( = D/2 = 90°-2P):
Bmax = 90°+C-2P Bmin = too low to matter
Minimum internal ray angle (min = C-P):
Bmax = 2C-P Bmin = too low to matter
"Live center" seen by both eyes (Figure 8):
sin = Rsin (C-P) ... where: = –6°
Maximum table size (Figure 9):
(T/W)max = tanC (tanP + tanB) / (tanC tanB +1)
Minimum table size (Figure 10):
(T/W)min = tan (tanP + tanB) / (tan tanB +1) ... where: sinB = R sin(B-)
Derivations of formulas will be provided upon request from the author:
Bruce Harding, 33 Anthony Drive,
Holden, Mass. 01520 (now 110 Maple Street, E. Brookfield, Mass. 01515)